Application Guide for Easy OpenVPN Multiclient Mode Setup
1. Summary
A VPN tunnel is an encrypted connection between your device and a VPN server.
OpenVPN is currently considered the top form of VPN tunneling protocol. That's because its encryption is especially strong. It's also adept at getting past firewalls.
Our remote cloud management platform InConnect can help setting up the OpenVPN tunnels without any hassle. Please check out: How to create an online portal account-InConnect Service
If you are using a private network without internet access or you have any other reasons preventing you from using InConnect, the following guide can help you setup your own OpenVPN tunnels.
This guide will show you how to configure IR305 Cellular Router as both OpenVPN Server and Client.

2. Configure IR305 as OpenVPN Server
2.1 Configure LAN Address
After entering configure page, click "Network"è"LAN", make sure IR305 and the application server are in the right subnet: 192.168.139.0/24, here we use:
IR305: 192.168.139.1/24 End Device: 192.168.139.69/24
2.2 Insert CA
Click "VPN"è"Certificate Management"
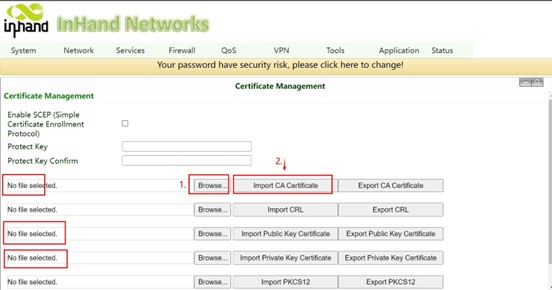
Click the "Browse" button at the left side of "Import CA Certificate" and then choose the right "root certificate" (e.g.: ca.crt), then click "Import CA Certificate" button.
Click the "Browse" button at the left side of "Import Public Key Certificate" and then choose the right public key file (e.g.: client1.crt), then click "Import Public Key Certificate" button.
Click the "Browse" button at the left side of "Import Private Key Certificate" and then choose the right private key file (e.g.: client1.key), then click "Import Private Key Certificate" button.
Then click "Apply button".
2.3 Add OpenVPN Tunnel for Each End Device
Click "VPN"è"OpenVPN Tunnels", then click "Add" to add a new tunnel, configure as below:
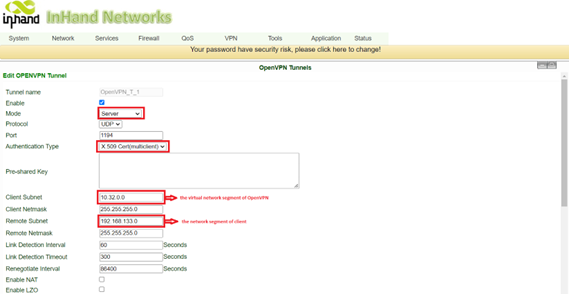

Then click "Save", after a few seconds, you will see:

The first tunnel is now successfully created.
Note: Create one tunnel for each end device and use different Client subnet IP and remote subnet IP.
e.g., Tunnel_1 Client subnet IP: 10.32.0.0, remote subnet IP: 192.168.133.0
Tunnel_2 Client subnet IP: 10.32.1.0, remote subnet IP: 192.168.134.0
2.4 Add Client Information for Each End Device
Go to VPN>>OpenVPN Advanced
Fill Username/Common Name, Local Static Route, and Remote Static Route for each end device.

2.5 Add Static Route for Each End Device
Go to Status>>Route Table, find out Gateway for each Tunnel

Go to Network>>Static Route
Add new static route for each end device
Put destination as client subnet, gateway as we found out in Route table, Interface as the tunnel we created for this device.

3. Configure IR305 as OpenVPN Client
3.1 Configure LAN Address
After entering configure web, click "Network" è"LAN", make sure IR305 and the end devices are in the right subnet: 192.168.139.0/24, here we use:
IR305: 192.168.133.1/24 End Device: 172.16.133.127/24
3.2 Insert CA
Click "VPN" è"Certificate Management":
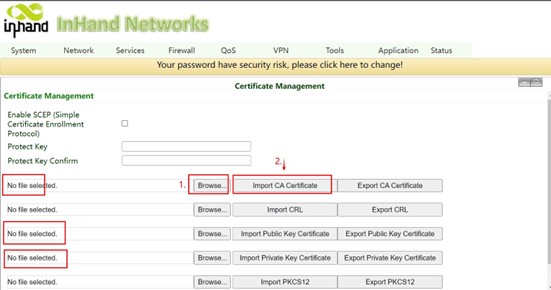
Click the "Browse" button at the left side of "Import CA Certificate" and then choose the right“root certificate” (e.g.: ca.crt), then click "Import CA Certificate" button.
Click the "Browse" button at the left side of "Import Public Key Certificate" and then choose the right public key file (e.g.: client1.crt), then click "Import Public Key Certificate" button.
Click the "Browse" button at the left side of "Import Private Key Certificate" and then choose the right private key file (e.g.: client1.key), then click "Import Private Key Certificate" button.
Then remember to click "Apply button".
3.3 Add OpenVPN Tunnel
Click "VPN"è"OpenVPN Tunnels",then click "Add" to add a new tunnel, configure as below:
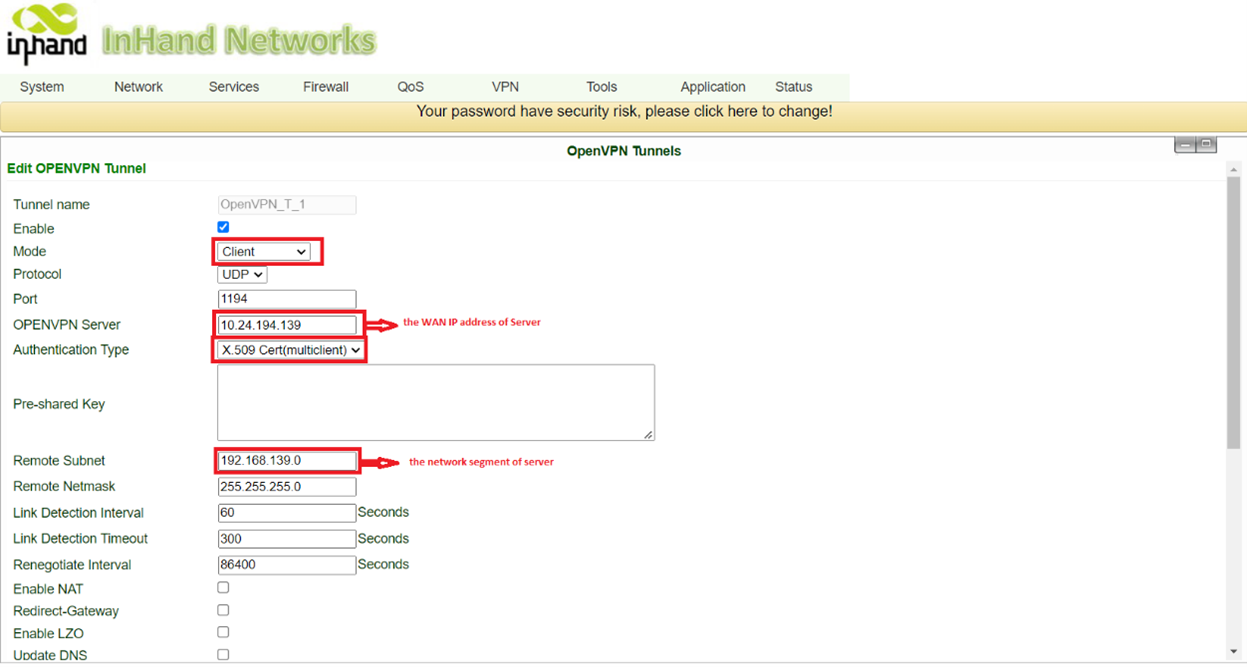

Then click "Save", after a few seconds, you will see:

The client is now created successfully!
4. Set up PC to connect to IR305 Server
If a PC is needed at the server side to access the other clients, a Static Route to the subnet of the Client is necessary.
In command prompt, enter "route add clientSubnetIP mask 255.255.255.0 ServerIP"
e.g., route add 192.168.133.0 mask 255.255.255.0 192.168.139.1

Topic Participants
jayfreemanjin