Configuration Guide: Exposing Internal Appliances via DMZ (Without Losing Router Management)
The Challenge
A common requirement in IoT deployments is allowing an external server to initiate a connection to a terminal device (like a PLC, Camera, or Server) connected to the InHand router.
Common solution: enable IP Passthrough (Bridge Mode)
Drawback: The InHand router acts as a transparent cable, causing you to lose local Wi-Fi management, DHCP, and Internet access for service laptops.
The Solution: DMZ Mode with Port Re-mapping
The best practice is to keep the InHand router in Router Mode (NAT) and use DMZ to forward traffic. This allows the appliance to receive all incoming traffic while ensuring the router remains accessible for management and Wi-Fi access.
Step 1: Preparation & Static DHCP
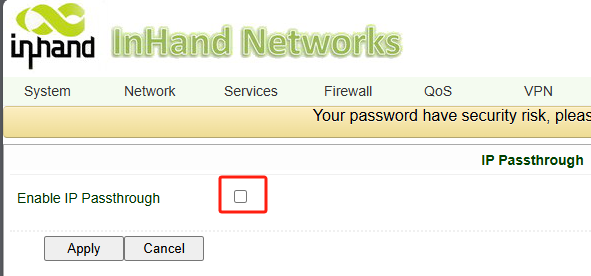
Disable IP Passthrough:
Purpose: If we don't disable it, the router is just like a dumb cable, passing through everything.
Navigate to Network >> Cellular (or WAN).

Ensure IP Passthrough is Unchecked (Disabled).
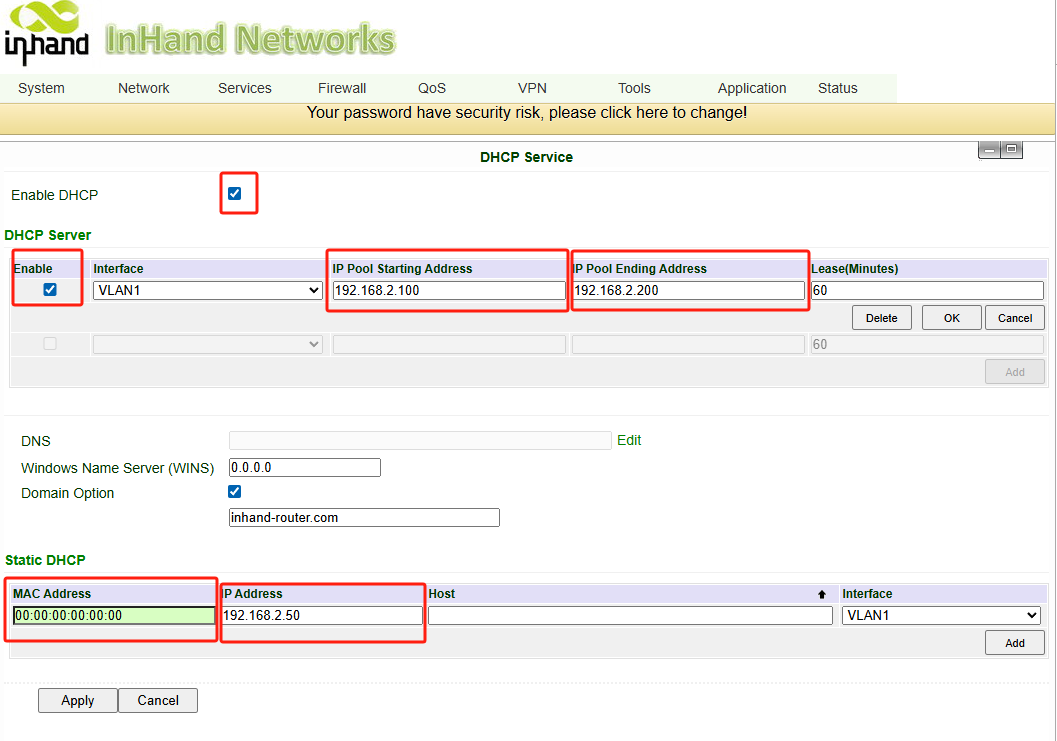
Configure DHCP:
Purpose: Need to setup an IP pool for all the other terminals which don't need to talk to the service on the internet directly via IP, and perform regularly with internet access and sitting behind the rout
Navigate to Services >> DHCP Service.

Set the IP Pool range (e.g.,
.100to.200) to leave room for static IPs.
Set Static DHCP Lease:
Purpose: give the terminal(s) MAC their own IP addresses that can be directly visible to the internet, so the IP needs to be out of the previous setup IP pool, which were reserved for other regular devices. Otherwise when DHCP reassigns the IP addresses to the devices, the MAC address may lose its static IP address.
Scroll to the Static DHCP Table.
MAC Address: Enter the MAC address of your terminal (e.g.,
CC:82:7F:xx:xx:xx).IP Address: Assign a fixed IP outside the pool (e.g.,
192.168.2.50).Click Add and Save.
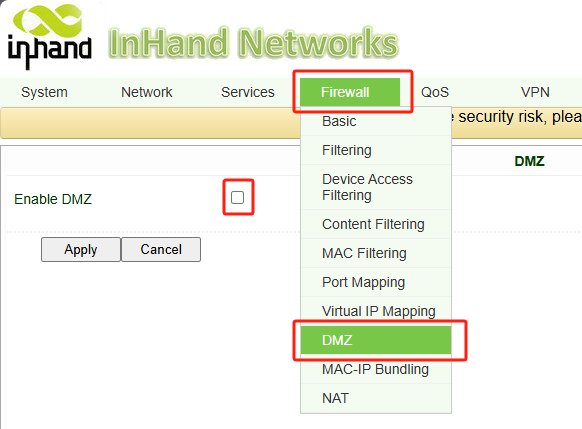
Step 2: Enable DMZ
Purpose: this is to open the router for incoming traffic can directly reach the assigned the terminal setup in previous DHCP fix MAC step. Basically it means, out of that regular DHCP IP pool, all other traffic can directly come to this IP address.
Navigate to Firewall >> DMZ.
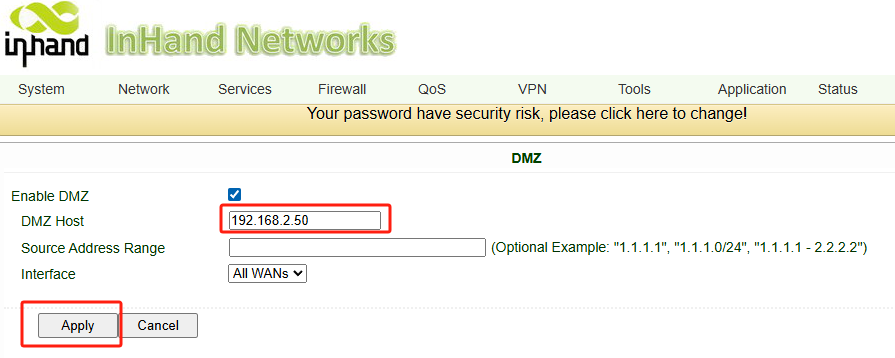
Enable the DMZ function.
DMZ Host: Enter the Static IP you set in Step 1 (
192.168.2.50).Source Address: Leave blank (Allow all) or restrict to a specific server IP for security.
Click Save & Apply.
Step 3: Resolve the "Port 80" Conflict (Crucial)
Purpose: if the port is not setup, when the technician wants to access the default gateway WebUI, it will still go to the terminal that configured in the previous step. So we give the default gateway a little modification, a port number.
By default, both your appliance and the InHand router listen on Port 80 (HTTP). When traffic hits the Public IP, the router intercepts it for its own login page, preventing access to the appliance. We must move the router's management port.
Navigate to System >> Device Management (or Administration >> Admin Access).

Locate HTTP Service or Server Port.
Change the HTTP Port from
80to8080.(Optional) Change the HTTPS Port from
443to8443.Click Save & Apply.

Note: Access to the router WebUI will be momentarily lost after clicking Save. Proceed to Step 4 to log back in.
Step 4: Accessing Your Devices
Now that the configuration is complete, here is how you access each device.
1. To Access the Appliance (Publicly)
Enter the Cellular Public IP in your browser.
URL:
http://[Public_IP_Address]Result: The InHand router sees the traffic on Port 80, checks the DMZ rule, and forwards it to the appliance (
192.168.2.50).
2. To Access the InHand Router (Locally)
Since we moved the router's port to 8080, you must specify this port when managing the router via Wi-Fi or LAN.
Result: You will see the InHand Login Page.
Topic Participants
Alfred Wang